AEG LAV60800 Manuale Utente
Navigare online o scaricare Manuale Utente per Lavatrici AEG LAV60800. Aeg LAV60800 User Manual [mk] Manuale Utente
- Pagina / 36
- Indice
- SEGNALIBRI
- LAVAMAT 60800 1
- 1 Safety instructions 2
- 3 Useful tips and hints 2
- 2 Environmental information 2
- Contents 3
- Operating Instructions 5
- 1 Safety 5
- Disposal 6
- 2 Old appliance 6
- Description of the appliance 7
- Control panel 7
- Programme overview 8
- Before the first wash 10
- Preparing and sorting washing 10
- Running a washing cycle 11
- EXTRA RINSE 13
- QUICK WASH 13
- Setting the delay timer 14
- ' etc.) 14
- Starting a programme 14
- Programme progress 15
- Child safety device 16
- Cleaning and maintenance 17
- What to do if 18
- Drain pump 22
- Technical data 23
- Consumption values 23
- Installing the appliance 25
- Where to install 26
- Electrical connection 27
- Permitted water pressure 28
- Water inflow 29
- 1 Important! 30
- Guarantee/Customer Service 31
Sommario
LAVAMAT 60800Washing machineUser information
10Before the first wash1. Open the detergent drawer.2. Pour approx. 1 litre of water through the detergent drawer into the washing machine. This close
11Running a washing cycleOpening the door/Loading the washing1. To open the door: gently pull the handle on the door.When the machine is switched on,
121. Pull the detergent dispenser drawer out as far as the stop.2. Add the detergent/additives.3. Push the drawer in fully.Washing powder/tablets for
13Changing the spin speed/Selecting rinse holdThe washing machine suggests the maximum permitted speed that is suitable for the selected pro-gramme. Y
14Hot pre-wash before the main wash that follows automatically; with intermediate spin for (COTTONS) and (EASY-CARES), without intermediate spin fo
15Programme progress• The programme progress display shows the programme step that is currently being carried out.– (Prewash)– (Main wash)– (Rinse)
16If (RINSE HOLD) has been selected: Following a rinse hold (END) will be lit on the programme progress display.The water must first be drained of
17Cleaning and maintenanceImportant! Do not use furniture care products or aggressive cleaners to clean the appliance. Wipe control panel and body wit
18What to do if...Remedying small malfunctionsIf during use of the appliance one of the following error codes is shown in the multi-display:– E10 (Pro
19The washing machine vibrates when operating or is not stable.The transit bar has not been removed.Remove the transit bar.The screw feet are not cor-
2Dear customer,Please read this User Information carefully and keep it to refer to at a later date.Pass this User Information on to any subsequent own
20If the wash results are not satisfactoryWashing is grey and scale is being deposited in the drum• Too little detergent is being used.• The right det
21Carrying out an emergency drain1 Warning! Before emergency draining, switch off the washing machine and remove the mains plug from the socket.Warnin
22Drain pumpThe drain pump is maintenance-free. It is only necessary to open the pump cover if there is a malfunction and water is no longer being pum
23Technical data5This appliance conforms with the following EU Directives:– 73/23/EEC dated 19.02.1973 Low Voltage Directive– 89/336/EEC dated 03.05.1
24Installation and connection instructions1 Safety information for the installation• This washing machine cannot be built-in.• Before using for the fi
25Installing the applianceTransporting the appliance1 Warning! The washing machine is very heavy. Risk of injury. Be careful when lifting.• Do not lay
263 Special spanner A and sealing caps B (2 off) and C (1 off) are supplied with the appliance.3. Remove screw D with its compres-sion spring using sp
27If the appliance is to stand on a plinth: In order for the appliance to be se-cure on the plinth, fixing plates*) must be mounted, into which the a
28Connecting to the water supplyImportant! • This appliance must not be connected to the hot water system.• When connecting it, use only new hose kits
29Water inflowA 1.50 m long pressure hose is supplied with the appliance. If a longer water inlet hose is required, only original hoses are to be used
3ContentsOperating Instructions. . . . . . . . . . . . . . . . . . . . . . . . . . . . . . . . . . . . . 5Safety . . . . . . . . . . . . . . . . . . .
30Water drainageThe maximum permitted difference between the height of the surface on which the appliance is installed and the water outlet is 1 metre
31Guarantee/Customer ServiceWeitere Kundendienststellen im AuslandIn diesen Ländern gelten die Garantiebedingungen der örtlichen Part-ner. Diese könne
32AustraliaANDI-Co Pty. Ltd9 Kingston Town CloseOakleigh VIC 3166Tel.: (03) 9569 1235Fax: (03) 9569 1450Korea (South)Core Incorp.3/F Chewoo Bldg.200 N
33JapanElectrolux Japan Ltd.Domestic Appliances DepartmentMaruzen Showa Warehouse BuildingTookai 4-5-12, Ota-ku143-006 TokyoTel.: 0120-13-7117Fax: 03-
35ServiceIn the event of technical faults, please first check whether you can remedy the problem yourself with the help of the operating instruc-tions
From the Electrolux Group. The world´s No.1 choice.The Electrolux Group is the world´s largest producer of powered appliances for kitchen, cleaning an
4Installation and connection instructions. . . . . . . . . . . . . . . . . 24Safety information for the installation. . . . . . . . . . . . . . . . .
5Operating Instructions1 SafetyPrior to using for the first time• Follow the ”Instructions for installation and connection”.• If the appliance is deli
6• Switch off the washing machine before cleaning, maintenance and servicing. In addition, pull the mains plug out of the socket or – in the case of a
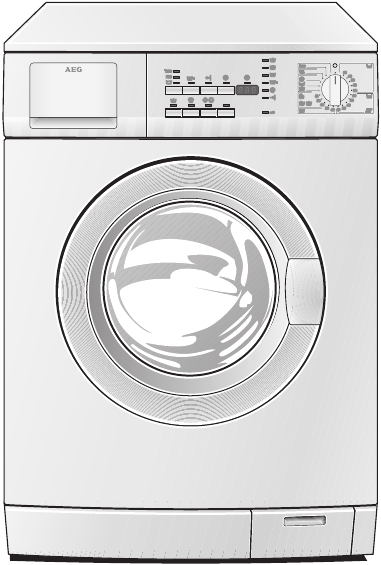
7Description of the appliance Control panel Detergent dispenser drawerScrew feet (height adjustable)Plinth flap/Drain pumpRating plate(behind door)Con
8Programme overviewProgrammemax. load 1) (dry washing)1) A 10 litre bucket contains approx. 2.5 kg of dry washing (cotton)Programme options Spin speed
9Application/features: Care symbols1) 1) The figures in the care symbols indicate the maximum temperatures.Energy-saving programme at 60 °C for lightl
Più documenti per Lavatrici AEG LAV60800


Prodotti e manuali riguardandi Lavatrici AEG LAV60800
 (56 pagine)
 (36 pagine)


 (56 pagine)
(24 pagine)
(28 pagine)
(56 pagine)
(32 pagine)
(56 pagine)
(60 pagine)
(52 pagine)
(24 pagine)
(44 pagine)
(56 pagine)
(24 pagine)
(28 pagine)
(56 pagine)
(32 pagine)
(56 pagine)
(60 pagine)
(52 pagine)
(24 pagine)
(44 pagine)
 (24 pagine)
 (64 pagine)
(52 pagine)
(32 pagine)
(40 pagine)
(28 pagine)
(64 pagine)
(52 pagine)
(32 pagine)
(40 pagine)
(28 pagine)
 (56 pagine)
© 2020, manymanuals.it. Tutti i diritti riservati | 0.674 s |
 Manymanuals.com
 Manymanuals.de
 Manymanuals.fr
 Manymanuals.it
 Manymanuals.pl
 Manymanuals.cz
 Manymanuals.es
 Manymanuals-pt.com
Commenti su questo manuale